XUL (library)
Overview
The XUL class is a powerful and flexible wrapper for Flash's XMLUI, allowing the developer to create and manage native XMLUI (XUL) user interfaces with a standardized set of controls, and an external API allowing you to interact with both the dialog and controls in an object-oriented manner.
Contents
Note that XUL is a HUGE class, conceptually and practically! The following links will help you navigate the Background and API sections:
Background
API
Summary
XUL family
The XUL family is made up of 3 main classes:
- XUL - builds, creates and manages XUL dialogs
- XULControl - an object-oriented way to interact with UI controls
- XULEvent - an object-oriented Event class to handle system and user events in the XMLUI dialog
Feature list
Used together, the XUL family offers the following functionality over and above building XMLUI dialogs manually:
Creation
- Powerful API allows for creation of all control types through code
- Shorthand declaration of controls, i.e. "checkbox:Do something=5,button:Press Me"
- Create dialogs directly from functions
- No need to write, save and manage raw XML files
- Custom XML can be used if necessary
Dialog & Controls
- A standard control layout consisting of a column of left-hand labels & right-hand controls
- New control types, such as checkbox groups
Interaction
- XULEvents allow true OO handling of events
- XULControl class allows for true OO manipulation of controls
- Basic validation requires all fields to be entered
Results
- Automatically call accept or cancel functions
- Values returned as values, not strings
Basic usage example
The task of a dialog is to collect user input as values and do something with them, typically handing them straight into a function.
As such, a typical use case might go something like the following:
- Create a function to do something with the user input
- Instantiate a XUL instance
- Add controls to the XUL instance
- Call the XUL show() method, passing in a reference to the function
In code, that looks like the following:
function test(a, b, c)
{
trace('You chose ' + [a, b, c]);
}
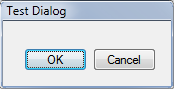
var xul = new XUL('Test dialog');
xul
.addTextbox('Value A')
.addSlider('Value B')
.addCheckbox('Value C')
.show(test)
Running that code would build the following dialog (note that an .fla needs to be open before displaying a XUL dialog):

Filling in the values and clicking OK would give something like the following result:
You chose "hello",30,true
Feature examples
The following code snippets are variations on the previous (basic) example, to quickly demonstrate some of the XUL functionality:
Values
The usual return type from an XMLUI dialog is an array of Strings. The XUL class provides an additional property values which returns actual data types, rather than simple Strings:
// run previous code, then...
Output.inspect(xul.values);
Inspect: Object (depth:4, objects:0, values:4, time:0.0 seconds)
--------------------------------------------------------------------------------
object => Object
   valuea: "Hello"
   valueb: 30
   valuec: true
UI from function
For creating dialogs quickly and simply, perhaps for testing or the Snippets panel, you can simply pass a callback function into the static create() method of the XUL class, which creates a simple textbox-based dialog from the function's arguments:
XUL.create(test, test);

Shorthand
Typing out a load of JSFL code just to create a dialog can be laborious, so the XUL class gives you an alternative to quickly create sophisticated dialog using shorthand creation of controls:
XUL
    .create('text:Value A,numeric:Value B,checkbox:Value C')
    .show(test);
Events
The XUL class supports the addition and management of proper object-oriented events through the API, rather than manually adding attributes to the original XML definition for the XUL dialog. Use the addEvent() method to add events and handlers in an object-oriented manner (note that unfortunately due to the Adobe implementation of XUL, only some controls support event handling):
function onChange(event)
{
    trace(event.control.value);
}

XUL
    .create('a, b, c')
    .addEvent('a', 'change', onChange)
    .show();

H
He
Hel
Hell
Hello
How the XUL class works
Overview
If you've written any XUL code in the past, you probably know that it can be a fairly involved process, with scant documentation and what feels like a somewhat limited and sometimes convoluted API.
The XUL class' primary aim is to abstract away the complication of manually building XML files, and at the same time seeking to solve as many inconsistencies as possible with the native API.
The following headings lay out XUL's main abstractions, and how it does it.
Building the XML dialog code
In order to successfully abstract the task of adding controls to an empty dialog shell, XUL sacrifices completely open flexibility for the tried-and-tested 2 column grid, with labels on the left and controls on the right. It does this by loading pre-written XML from a template file, using the <grid> and <rows> elements. Each of the addControl() methods then adds a new row to the XML, building the final XML code that will become a XUL dialog.
Saving and showing the dialog
On top of not needing to write any XML code yourself, the class also saves you the bother of saving and reloading it. Whenever you call xul.show(), the class finalizes any existing internal XML, then saves it to xJSFL/core/ui, before loading the code and showing the dialog.
Validating and returning values
Upon clicking the OK button in the dialog, the values in the dialog are first validated to make sure they are not blank (except if optional) and if so, the dialog box is re-shown. When the values are finally filled in, the dialog is allowed to close.
Finally, the usual String settings returned from the dialog are converted into their appropriate data types, such as Number, Boolean, and even Arrays (see xjsfl.parseValue() for more details).
Adding and handling Events
Native JSFL provides event handling via special XML attributes (command, change, etc) on the XML control nodes. xJSFL abstracts this so you add events and event-handlers in a more familiar way using the addEvent() method, as well as adding some extra initialization handlers. Internally, the correct attributes are added to the XML, and internal callbacks are routed through the XUL core before finally building an Event object which is passed to the originally-supplied external callback.
For more information see the XULEvent class.
Accessing controls
From within event handling code, you can access both the control that spawned the event, as well as the other controls on in the XUL dialog. Instead of using xmlui.set and xmlui.get methods, you now simply access the controls as if they were actual objects, i.e. event.control.value. Of course, there is no such new control element, but by wrapping all control-related functionality in a new XULControl class, the aim of object-orientation is achieved.
For more information see the XULControl class.
Last words
It should be noted that the native Adobe XUL implementation not-only somewhat limited, but there are features or functions that simply appear broken or unimplemented. xJSFL XUL does its best to work around these, but at the time of development, there are still omissions or inconsistencies that appear to be impossible to overcome.
API
The XUL API is quite large, so the API has been broken into the following sections:
Properties
The XUL instance has the following public properties:
controls
The array of XULControls that exist in the XUL dialog
The following example lists the ids of the XULControl instances that are created and assigned to the controls property on XUL instantiation:
function onInitialize(event)
{
	for each(var control in this.controls)
	{
		trace(control.id + ':' + control.value);
	}
}

var xul = XUL
	.factory('textbox:text=Hello there,checkbox:state=true,dropdown:Options=[One,Two,Three]')
	.addEvent('initialize', onInitialize)
	.show();
text:Hello there
state:true
options:One
settings
The raw settings generated by Flash when the dialog is closed
The following example creates a dialog then outputs the raw settings after the user clicks OK:
var xul = XUL
	.factory('textbox:Name,slider:Value,checkboxes:Elements=[Movieclip,Graphic,Button],dropdown:Options=[One,Two,Three]')
	.show();

Output.inspect(xul.settings);

Inspect: Object (depth:4, objects:0, values:8, time:0.0 seconds)
-------------------------------------------------------------------------
object => Object
	 name: "Dave"
	 value: "50"
	 elements[Movieclip]: "true"
	 elements[Graphic]: "true"
	 elements[Button]: "false"
	 options: "Two"
	 xulid: "0"
	 dismiss: "accept"
values
The parsed values converted from the setting object, when the dialog is closed
The values property differs from settings as xJSFL automatically parses the raw String settings into the appropriate data types using xjsfl.utils.parseValue, and additionally, checkbox groups are parsed into Arrays.
The following example creates a dialog then outputs the parsed values after the user clicks OK:
var xul = XUL
	.factory('textbox:Name,slider:Value,checkboxes:Elements=[Movieclip,Graphic,Button],dropdown:Options=[One,Two,Three]')
	.show();

Output.inspect(xul.values);
Inspect: Object (depth:4, objects:1, values:6, time:0.0 seconds)
-------------------------------------------------------------------------
object => Object
	 name: "Dave"
	 value: 50
	[elements] => Array
		 0: "Movieclip"
		 1: "Graphic"
	 options: "Two"
	 accept: true
Note that if the user cancels, values will return null.
xml
The XML generated by the class to create the XUL dialog
The following example creates a dialog then outputs the XML created after the user clicks OK:
var xul = XUL
	.factory('textbox:Name,slider:Value,checkboxes:Elements=[Movieclip,Graphic,Button],dropdown:Options=[One,Two,Three]')
	.show();

trace(xul.xml);
<dialog id="dialog" title=" xJSFL" buttons="accept,cancel">
    <content>
        <grid>
            <columns id="columns">
                <column flex="1"/>
                <column flex="2"/>
            </columns>
            <rows id="controls">
                <row template="textbox">
                    <label value="Name:" width="80"/>
                    <textbox class="control" id="name" value="" maxlength="" prompt="" size="" multiline="false" width="" flex="1" oncreate="xjsfl.ui.handleEvent('{xulid}', 'create', 'name')" onchange="xjsfl.ui.handleEvent('{xulid}', 'change', 'name')"/>
                </row>
                <row template="popupslider">
                    <label value="Value:" width="80"/>
                    <popupslider class="control" id="value" value="0" minvalue="0" maxvalue="100" orientation="horz" tabindex="" width="60" flex="" oncreate="xjsfl.ui.handleEvent('{xulid}', 'create', 'value')"/>
                </row>
                <row template="checkboxgroup">
                    <label value="Elements:" width="80"/>
                    <vbox class="control" groupbox="true">
                        <checkbox class="control" id="elements[Movieclip]" label="Movieclip" checked="true" tabindex="" acceskey="" value="Movieclip" selected="true" oncreate="xjsfl.ui.handleEvent('{xulid}', 'create', 'elements[Movieclip]')"/>
                        <checkbox class="control" id="elements[Graphic]" label="Graphic" checked="true" tabindex="" acceskey="" value="Graphic" oncreate="xjsfl.ui.handleEvent('{xulid}', 'create', 'elements[Graphic]')"/>
                        <checkbox class="control" id="elements[Button]" label="Button" checked="true" tabindex="" acceskey="" value="Button" oncreate="xjsfl.ui.handleEvent('{xulid}', 'create', 'elements[Button]')"/>
                    </vbox>
                </row>
                <row template="menulist">
                    <label value="Options:" width="80"/>
                    <menulist class="control" id="options" editable="" width="" flex="1" tabindex="" oncreate="xjsfl.ui.handleEvent('{xulid}', 'create', 'options')" onsetfocus="xjsfl.ui.handleEvent('{xulid}', 'setfocus', 'options')" onchange="xjsfl.ui.handleEvent('{xulid}', 'change', 'options')">
                        <menupop class="control" id="menupop">
                            <menuitem label="One" value="One" selected="true"/>
                            <menuitem label="Two" value="Two"/>
                            <menuitem label="Three" value="Three"/>
                        </menupop>
                    </menulist>
                </row>
            </rows>
        </grid>
    </content>
    <script>xjsfl.ui.handleEvent({xulid}, 'initialize');</script>
    <textbox id="xulid" value="{xulid}" visible="false"/>
</dialog>
API - Instantiation
XUL(title)
XUL constructor
The following example creates a XUL instance, with the title "Test Dialog", then shows it:
var xul = new XUL("Test Dialog");
xul.show();
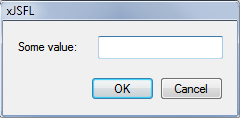
factory(props)
Static convenience method to instantiate and return a new chainable XUL instance
The static factory method provides the starting point for a chain of commands. The following example creates, adds a control (see shorthand declaration) and shows the dialog in one line of code:
var xul = XUL
    .factory('textbox:Some Value')
    .show();
create(props, accept, cancel)
Static convenience method to create and show interface in one call, returning any submitted values
The static create method is a quick-fire way to build and display a dialog, then respond to user input, all in one line of code.
The following example creates a dialog, adds some textboxes (see shorthand declaration) then traces the result to the Output panel:
function accept(one, two, three)
{
	trace([one, two, three].join(' '));
}

XUL.create('One,Two,Three', accept);

hello there user!
Note that the parameters passed to the callback function are the ordered values of the dialog controls themselves, therefore your callback function will require as many parameters as there are controls.
Create also allows you to pass in a single function from which to create the UI with, which it does by parsing the arguments of the function, and creating textboxes per argument.
Finally, you can pass only a function to create() if you wish, which will build a textbox control per function argument, validate the input, then pass the results to the supplied function for processing:
XUL.create(accept);
API - Adding controls
Adding controls manually
Controls can be added to XUL instances using any of the addControl() methods, which allow you to add explicit label, id, attributes, validation and event handlers. You can also add controls using shorthand expressions, which allow for much quicker adding of controls at the expense of flexibility, however shorthand declaration is often more than enough to get you started.
Note that validation is not yet implemented in the xJSFL API, so the validation parameter is at the moment, redundant, and may be removed in future versions. Currently validation is limited to required fields only.
The following methods are available for adding controls:
Single-value controls
Multiple-value controls
Layout or presentation
Custom content
Adding controls and properties via shorthand
The XUL class also allows you to add controls using the add() method and custom shorthand declaration, rather than specific addControl methods. Whilst shorthand lacks the complete customisation that the full methods afford you, they are great for quickly creating dialogs with enough functionality to get started.
The shorthand syntax defines the following (ordered) parameters:
- The control type (control:)
- The control label (Any text)
- The control value (=some value)
In code, the format of the shorthand notation looks like this:
control:Label=value
The following rules also apply:
- The control type is optional, defaulting to textbox if not supplied
- Controls may have multiple control types, i.e. text, textbox, textarea
- Labels define both internal ids and named return parameters for controls, so must be unique
- Control values are also optional, and may be supplied as Strings, Numbers, Arrays or Object syntax (depending on the control)
- Multiple controls may be added by delimiting with commas
- Separators may be added using the pipe ( | ) character
- title, width and columns may be given using the format property:value
add(str)
Add control using shorthand notation
As mentioned above, the add() method allows you to add both controls and properties in an expressive, shorthand manner.
The following example demonstrates some typical shorthand expressions:
Name=Dave
button:Click Me!
radiogroup:Options=[1,2,3,4]
dropdown:Options={one:1,two:2,three:3,four:4}
Value 1,Value 2,Value 3
numeric:Size (pixels), numeric:Width (pixels), numeric:Alpha (%),title:Adjust object size
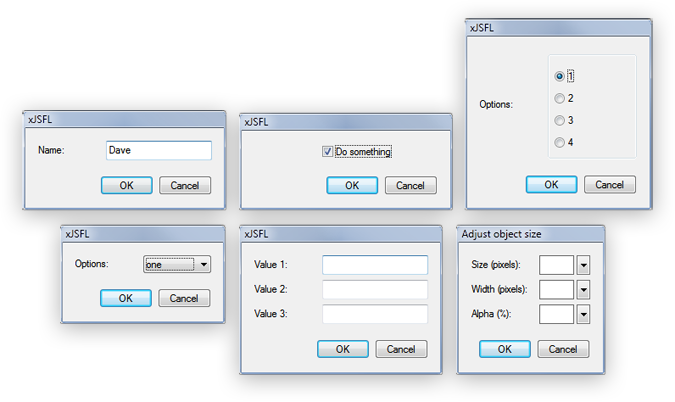
In the examples that follow, the appropriate shorthand declaration(s) will be shown alongside the explicit addControl method, where appropriate.
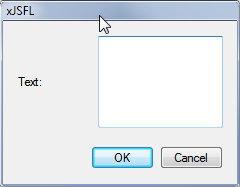
addTextbox(label, id, attributes, validation, events)
Add a Textbox control to the UI
The following example adds a multiline text box:
XUL
    .factory()
    .addTextbox('Text', 'name', {multiline:true})
    .show();
The following examples create various types of textbox via shorthand declaration:
XUL.create('Enter some text'); // no control type defaults to textbox
XUL.create('text:Text');
XUL.create('text:Text=This is some text'); // adds some default text
XUL.create('textbox:Text');
XUL.create('textfield:Text');
XUL.create('textarea:Text'); // textarea creates a multiline textbox
Note that the following keywords are all acceptable in shorthand declaration:
- text
- textfield
- textbox
- textarea (a multiline text box)
addSlider(label, id, values, attributes, validation, events)
Add a Popupslider control to the UI
The following example creates 3 sliders:
XUL
    .factory()
    .addSlider('Red', 'red', [0, 0, 255])
    .addSlider('Green', 'green', [0, 0, 255])
    .addSlider('Blue', 'blue', [0, 0, 255])
    .show();

The following examples create various sliders via shorthand declaration:
XUL.create('slider:Red=[0,0,255]');
XUL.create('popupslider:Red=[50,0,255]'); // set a default value of 50
XUL.create('numeric:Red=[50,0,255]'); // use the alternative "numeric" keyword
Note that the following keywords are all acceptable in shorthand declaration:
- slider
- popupslider
- numeric
addCheckbox(label, id, attributes, validation)
Add a Checkbox control to the UI
The following example adds a checkbox to a XUL dialog:
XUL
    .factory()
    .addCheckbox('State', null, {checked:false})
    .show();
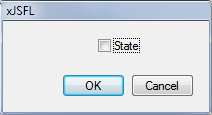
The following examples create checked and unchecked checkboxes via shorthand declaration:
XUL.create('checkbox:State'); // checkboxes via shorthand declaration are unchecked by default
XUL.create('checkbox:State=true');
XUL.create('checkbox:State=false');
addColorchip(label, id, attributes, validation, events)
Add a Colorchip control to the UI
The following example :
XUL
    .factory()
    .addColorchip('Color 1', 'c1', {value:'0xFF0000'})
    .addColorchip('Color 2', 'c2', {value:'#00FF00'})
    .addColorchip('Color 3', 'c3', {value:255})
    .show();
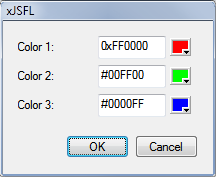
The following example create a colorchip via shorthand declaration:
XUL.create('colorchip:Color 1=#FF0000,colorchip:Color 2=#00FF00,colorchip:Color 3=#0000FF');
Note that the following keywords are all acceptable in shorthand declaration:
- color
- colorchip
- colorpicker
addFile(label, id, attributes, validation, events)
Add a Choosefile control to the UI
The following example creates a dialog with both open and save fields:
XUL
    .factory()
    .addFile('Open file');
    .addFile('Save file', null, {type:'save'});
    .show();
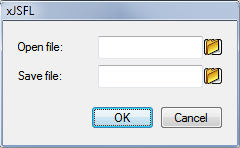
The following examples creates the same dialog via shorthand declaration:
XUL.create('file:Open file,save:Save file');
Note that the following keywords are all acceptable in shorthand declaration:
- file
- choosefile
- openfile
- savefile
- save
addButton(label, id, attributes, events)
Add a Button control to the UI
The following example adds a button to the UI and binds and event handler to it in the same call (alternatively you could use addEvent()):
function onClick(event)
{
	this.controls.waiting.value = new Date()
}

XUL
    .factory()
    .addButton('Click me!', 'button', {width:200}, {click:onClick})
    .addTextbox('Waiting...')
    .show();
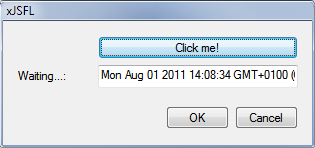
The following example creates a button via shorthand declaration:
XUL.create('button:Click me!');
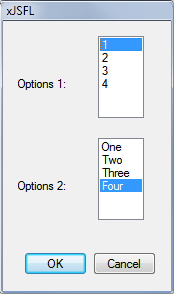
addListbox(label, id, values, attributes, validation, events)
Add a Listbox control to the UI
The following example uses both Array and Object types to build a couple of listbox controls. Note that the object names will be mapped to labels, as in the second control::
var xul = XUL
    .factory()
    .addListbox('Options 1', null, [1, 2, 3, 4])
    .addListbox('Options 2', null, {'One':1, 'Two':2, 'Three':3, 'Four':4 })
    .show();
The returned values of the dialog would be as follows:
Inspect: Object (depth:4, objects:0, values:3, time:0.0 seconds)
----------------------------------------------------------------
object => Object
	 options1: 1
	 options2: 4
	 accept: true
The following example creates the same dialog as above via shorthand declaration (note that the object declaration does not need any additional quotes):
XUL.create("listbox:Options 1=[1,2,3,4], listbox:Options 2={One:1, Two:2, Three:3, Four:4 }");
Note that the following keywords are all acceptable in shorthand declaration:
- listbox
- list
addDropdown(label, id, values, attributes, validation, events)
Add a Menulist control to the UI
The following example uses both Array and Object types to build a couple of dropdown controls. Note that the object names will be mapped to labels, as in the second control::
var xul = XUL
    .factory()
    .addDropdown('Options 1', null, [1, 2, 3, 4])
    .addDropdown('Options 2', null, {'One':1, 'Two':2, 'Three':3, 'Four':4 })
    .show();
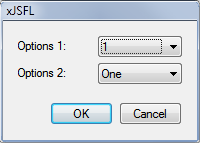
The returned values of the dialog would be as follows:
Inspect: Object (depth:4, objects:0, values:3, time:0.0 seconds)
----------------------------------------------------------------
object => Object
	 options1: 1
	 options2: 4
	 accept: true
The following example creates the same dialog as above via shorthand declaration (note that the object declaration does not need any additional quotes):
XUL.create("dropdown:Options 1=[1,2,3,4], dropdown:Options 2={One:1, Two:2, Three:3, Four:4 }");
Note that the following keywords are all acceptable in shorthand declaration:
- dropdown
- menulist
addRadiogroup(label, id, values, attributes)
Add a RadioGroup to the UI
The following example uses both Array and Object types to build a couple of radiogroup controls. Note that the object names will be mapped to labels, as in the second control::
var xul = XUL
    .factory()
    .addRadiogroup('Options 1', null, [1, 2, 3, 4])
    .addRadiogroup('Options 2', null, {'One':1, 'Two':2, 'Three':3, 'Four':4 })
    .show();

The following example creates the same dialog as above via shorthand declaration (note that the object declaration does not need any additional quotes):
XUL.create("radio:Options 1=[1,2,3,4], radio:Options 2={One:1, Two:2, Three:3, Four:4 }");
Note that the following keywords are all acceptable in shorthand declaration:
- radiogroup
- radios
- radio
addCheckboxgroup(label, id, values, attributes, validation)
Add a CheckboxGroup to the UI
The checkbox group control is a new control unique to xJSFL, that allows you to select multiple values, and have the results returned as an Array.
The following example uses both Array and Object types to build a couple of listbox controls. Note that the object names will be mapped to labels, as in the second control::
var xul = XUL
    .factory()
    .addCheckboxgroup('Options 1', null, ['Movieclip', 'Graphic', 'Button'])
    .addCheckboxgroup('Options 2', null, {'Movieclip':1, 'Graphic':2, 'Button':3})
    .show();
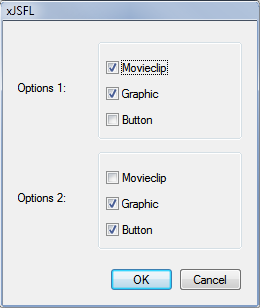
The returned values of the dialog would be as follows:
Inspect: Object (depth:4, objects:2, values:5, time:0.0 seconds)
--------------------------------------------------------------------------------
object => Object
    [options1] => Array
         0: "Movieclip"
         1: "Graphic"
    [options2] => Array
         0: 2
         1: 3
     accept: true
The following example creates the same dialog as above via shorthand declaration (note that the object declaration does not need any additional quotes):
XUL.create("checkboxes:Options 1=[1,2,3,4], checkboxes:Options 2={One:1, Two:2, Three:3, Four:4 }");
Note that the following keywords are all acceptable in shorthand declaration:
- checkboxgroup
- checkboxes
addTargetlist(label, id, attributes, validation, events)
Add a Targetlist control to the UI
The following example :
var xul = XUL
    .factory()
    .addTargetlist('Element', 'element', {width:300})
    .show();
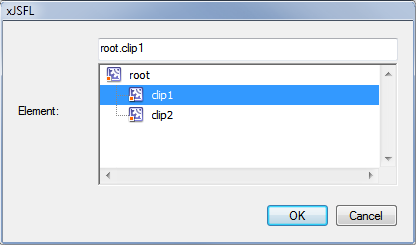
The following example creates the same dialog as above via shorthand declaration:
XUL.create('targetlist:Element');
Missing methods
The following methods are currently broken, so are not yet documented:
- addSeparator()
- addSpacer()
- addLabel()
- addXML()
API - Setting custom content
setFlash(src, width, height, properties)
Replaces the standard controls with a Flash control
The setFlash() method is used to completely replace the templated layout of the XUL dialog with a custom Flash UI. The Flash UI should be built in Flash, and in order to send values back to the JSFL environment, the following command should be called in the SWF for each named value:
MMExecute('fl.xmlui.set("' +name+ '", "' +value+ '")');
The following example creates a custom flash UI, and creates text, value, and color <property> nodes in the XML, ready for population from the SWF:
var xul = XUL
    .factory()
    .setFlash('user/testing/ui.swf', 400, 200, ['text', 'value', 'color'])
    .show();
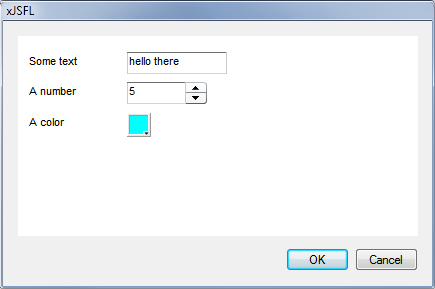
The returned values of the dialog would be as follows:
Inspect: Object (depth:4, objects:0, values:4, time:0.0 seconds)
--------------------------------------------------------------------------------
object => Object
	 text: "hello there"
	 value: 5
	 color: "#00FFFF"
	 accept: true
setXML(xml)
Replace the standard XML dialog template
Set XML allows you to assign your own XML to the XUL dialog, which is then parsed and the XML controls converted to xJSFL XULControls, which can then receive events and validation.
The following example sets two custom textboxes, then adds some native xJSFL XULEvents to pick up their values, and finally, validates.
function onChange(event)
{
    trace(event.control.id + ':' + event.control.value);
}

var xul = XUL
    .factory()
    .setXML('<hbox><textbox id="one" width="200" /><textbox id="two" width="200" /></hbox>')
    .addEvent('one two', 'change', onChange)
    .show();

Output.inspect(xul.values);

Upon typing in the text boxes, you can see that the event handlers see the controls as if they were added through the native XUL add methods.
one:o
one:on
one:one
two:t
two:tw
two:two
Finally, the dialog returns valid values:
Inspect: Object (depth:4, objects:0, values:3, time:0.0 seconds)
--------------------------------------------------------------------------------
object => Object
	 one: "one"
	 two: "two"
	 accept: true
API - Setting properties
The following properties can be set on the XUL instance:
- setValues - set the initial values of the XUL dialog
- setColumns - set the width of the left and right columns
- setButtons - set the OK and Cancel buttons
- setTitle - set the title of the dialog
setValues(values)
Sets the initial values of controls in the dialog
Note that checkbox groups are not yet supported.
The following example creates a small dialog and sets the values on the radiogroup:
XUL
    .factory('radios:Options=[Movieclip,Graphic,Button],checkbox:Delete')
    .setValues({options:'Graphic','delete':true})
    .show();
setTitle(title)
Set the title of the dialog
The following example sets the title of a new dialog to "Test Dialog":
XUL
    .factory()
    .setTitle('Test dialog')
    .show();
The following examples achieves the same result via shorthand declaration:
XUL.add('title:Test Dialog');
setButtons(str)
Set the default buttons of the XMLUI dialog
The following example hides the default buttons and adds an alternative button, which alerts the value of a textbox using an event handler, then closes the dialog:
function onClick(event)
{
	alert('The value of the textbox is: ' + this.controls.value.value);
	this.close();
}

XUL
    .factory()
    .setButtons('')
	.addTextbox('Enter a value', 'value')
	.addButton('Click me!', 'button')
	.addEvent('button', 'click', onClick)
    .show();

setColumns(columns)
Set the widths of the dialog's columns
Note that setColumns is currently broken. It will be fixed once the documentation is complete
The following examples creates a very wide right-hand column:
XUL
    .factory()
    .setColumns([100,500])
    .addTextbox('Very long value')
    .show();
The following examples achieves the same result via shorthand declaration:
XUL.create('columns:[100,500]');
API - Adding events
addEvent(ids, types, callback)
Add (or actually, set) a event callback for an id
Events and event handlers can be added for some, not all of the JSFL XUL control types. Events are added using the signature above, and are handled using a callback with a single XULEvent parameter, typically called, event.
The following example sets events for all the control types that support them, then outputs their structure to the Output panel:
function onEvent(event)
{
	clear();
	this.xml = this.content = '[HIDDEN]'; // remove for clarity
	Output.inspect(event, 'Event', {'function':false}, 2);
	if(event.control)
	{
		Output.inspect(event.control.value, 'Value');
	}
}

XUL
    .factory()
	.add('Text,color:Color,list:Options=[1,2,3],dropdown:Values=[a,b,c],button:Click Me!')
    .addEvent('initialize', onEvent)
    .addEvent('text color', 'change', onEvent)
    .addEvent('options values', 'change onsetfocus', onEvent)
    .addEvent('clickme', 'click', onEvent)
    .show();

Upon updating or clicking the controls in the dialog, the following output would occur:
Event: XULEvent (depth:2, objects:9, values:15, time:0.0 seconds)
--------------------------------------------------------------------------------
object => XULEvent
	 type: "change"
	[control] => XULControl
		 id: "options"
		 type: "listbox"
		 enumerable: true
		 combo: true
		 value: 1
		[element] => Object
	[xul] => XUL
		 xml: "[HIDDEN]"
		[controls] => Object
		 settings: null
		[events] => Object
		[rules] => Object
		[columns] => Array
		 error: null
		 id: 0
		 title: "xJSFL"
		 content: "[HIDDEN]"
		 built: true
		 separator: ""
		 open: false
		[values] => Object
		 constructor: [ SKIPPING! ]
	[xmlui] => XMLUI


Value: Number (depth:4, objects:0, values:0, time:0.0 seconds)
--------------------------------------------------------------------------------
1
More details can be found on the XULEvent page.
setEventScope(scope)
Set the scope in which events will run
When event handlers are added using addEvent(), their event handlers are called when the event is fired. By default, this is set to the window object, but you can set a different scope if you want, such as another object or instance.
The following example sets the event scope to an object with the property lib, so the this in the callback function will refer to the lib object itself, rather than the window:
lib =
{
	name:'lib',
	onEvent:function(event)
	{
		trace('Scope test:' + this.name);
	}
}

XUL
    .factory()
	.setEventScope(lib)
	.add('button:Click Me!')
    .addEvent('clickme', 'click', lib.onEvent)
    .show();
The result of clicking the button traces the name of the object to the output panel:
Scope test:lib
If the events' scope was not set to lib, the scope would remain scoped to window, and the callback would fail:
Scope test:undefined
API - Showing the dialog
saveAs(uri)
Save the dialog in a particular location so custom Flash controls can reference the src attribute properly
There are occasions when you may wish for the physical XML code to be saved elsewhere that xJSFL/core/ui, for example when using setFlash()
The following example saves the dialog to the user folder before showing:
XUL
    .factory()
	.add('text:This is a custom textbox')
    .saveAs('user/ui/dialog.xml')
    .show();
show(accept, cancel)
Shows the XUL dialog
The show function is always the final call in chain of commands, and shows the final XUL dialog. show() also allows you to pass in 2 optional parameters, which are callbacks to be called on the user pressing OK, or cancel. The parameters passed to the accept callback are the values of the interface controls in the order that they were created.
The following example creates two numeric text boxes and passes the values automatically to an accept callback when the user clicks OK, or calls a cancel callback if the user cancels:
function accept(a, b)
{
	trace('The product of the values is ' + a * b);
}

function cancel()
{
	trace('We will never know the sum of those numbers!')
}

XUL.factory()
	.setTitle('Callbacks')
	.addSlider('Value 1', 'value1', Math.floor(Math.random() * 100))
	.addSlider('Value 2', 'value2', Math.floor(Math.random() * 100))
	.show(accept, cancel);

Clicking OK calls the accept callback, and shows the following message:
The product of the values is 2916
Clicking Cancel calls the cancel callback, and shows the following message:
We will never know the sum of those numbers!
The alternative to supplying callbacks to the show() method is to simply retrieve the settings or values from the xul instance itself, and do something meaningful with them:
trace('The product of the values is ' + xul.values.a * xul.values.b);
The product of the values is 2916
close(state)
Closes the dialog
The following example creates some controls, hides the standard buttons, and closes the dialog using a click event:
function onClose(event)
{
	this.close(true);
}

var xul = XUL
	.factory()
	.add('checkbox:State,button:Close')
	.addEvent('close', 'click', onClose)
	.setButtons()
	.show();

Output.inspect(xul.values);
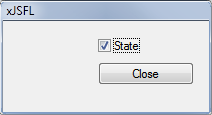
Once the dialog is closed, the script continues with any subsequent commands:
Inspect: Object (depth:4, objects:0, values:2, time:0.0 seconds)
--------------------------------------------------------------------------------
object => Object
	 state: true
	 accept: true
The example for Events https://xjsfl.vercel.app/support/api/ui/XUL#events doesn’t work. It looks like create() only returns a generic object. If you use .factory() that does work.
function onChange(event)
{
trace(event.control.value);
}
XUL
.factory(‘a, b, c’)
.addEvent(‘a’, ‘change’, onChange)
.show();
Checkboxes: No matter what I squeeze in as attributes, or what method I use to generate a dialog: state of checkbox is always “checked”.
Example from above: XUL.factory().addCheckbox(‘State’, null, {checked:”false”});
produces a checked CB (under Flash CC).
Reverted back to standard XML-dialog-handling without xJSFL. Maybe something wrong with Flash CC?
Yeah, unfortunately, CC creates checkboxes checked by default. I submitted a bug for this, so I’ll chase that up.
hey, thanx for the quick reply! thought it was “all new-Flash CC”. You’ve got a donate button? really like to shove over some bucks as like your work. I don’t do PayPal though (after bad encounters), but if Paypal would be the only way, I’d figure something out :)
Ah, thanks Klaus!
Actually funding the framework is something I’ve been thinking about a lot more recently, as I’m being pulled in all sorts of directions. Keep an eye on me on twitter, and I’ll announce something as soon as I know what I’m doing.
Cheers again,
Dave
How can I save a format of a string for textBox. For example, I need to forward the text “0123456789” and now it converts to “123456789”.