Writing an xJSFL Snippet
Overview
We're going to write a typical Snippet, and it's going to have the following features:
- It will randomise the size, position and rotation of selected elements on the stage
- It will alert the user if there's no selection
- It will display a simple interface allowing the user to edit parameters and apply the changes interactively
- It will display a custom icon and tooltip
- The entire script will be 10 lines of code
If that sounds ambitious, remember that xJSFL has been designed from the ground up to abstract complex tasks into simple one-liners, and is written with the workflow of the typical Flasher in mind.
The following steps will build up a basic script into something rather useful, and will add new concepts at each step of the way, so with that in mind, let's write some xJSFL.
The basics
The purpose of this Snippet is to move selected elements around on stage, and to do this, we're going to use the ElementSelector and an ElementCollection, and more specifically its randomize() method.
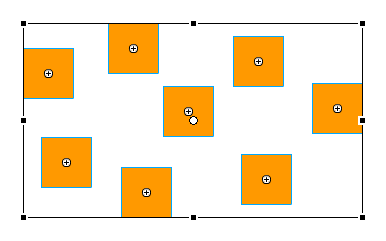
Before we start, either create some new symbol instances on the stage, or drag some existing items from your document's library onto the stage so you have something to work with, and select them:

Now, in Komodo Edit, create a new script, and enter the following lines:
xjsfl.init(this);

var collection = $($selection);
trace(collection);
Save, then run the script by pressing CTRL+Enter as usual and observe the Output panel. You should see something along the same lines as the following:
> xjsfl: initializing...
[object ElementCollection length=12]
Congrats - you now have an ElementCollection to work with. We want to randomise the position of these elements, so let's use the randomize() method and move things around a bit.
Add the following line to your script, then run it again:
collection.randomize({width:'20', height:'20', rotation:'20'});
You should see the elements on stage change size and rotation slightly, like so:

Adding a user interface
Now we know that the script works, lets add a user interface, so we can update the values without having to manually update the JSFL each time.
User Interfaces in xJSFL are built primarily using the XUL class. XUL stands for XML User Interface Language, an XML-based language designed by Mozilla to create rich user interfaces. Flash uses a subset of XUL to build simple but effective UIs, and xJSFL abstracts XUL to a class-based paradigm allowing the developer to build UIs without writing any XML at all.
The XUL class has powerful object-oriented functionality allowing you to add controls one by one using parametrised .add() methods, or alternatively you add the controls using shorthand, which is the approach we'll be using here for speed of development.
Update your current script so it reads as follows:
xjsfl.init(this);

var collection = $($selection);
var xul = XUL.factory('Width,Height,Rotation').show();

collection.randomize(xul.settings);

Output.inspect(xul.settings);
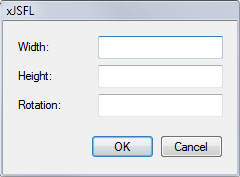
Run the script, and you should see the following user interface appear:

The expression we entered in the factory() method created the most basic type of interface controls, textboxes. The XUL shorthand is actually a lot more advanced than that, but for this demo, it will suffice.
Anyway, enter some numeric values in the text fields, then click OK or press Enter to apply your settings.
If everything's gone to plan, you should get a result similar to before, and should see the following output (or something similar) in the output panel:
Inspect: Object (depth:4, objects:0, values:5, time:0.0 seconds)
----------------------------------------------------------------------------------------------------
object => Object
	 width: "200"
	 height: "10"
	 rotation: "30"
	 xulid: "0"
	 dismiss: "accept"
This is the raw results of the parameters of the XUL dialog, which are always strings. The ids for each of the controls are generated automatically from the shorthand control definition, and as you can see they map directly to the same properties (width, height, rotation) required by the ElementCollection.randomize() method.
You can also quiz the xul instance for its .values property, which is the same hash of ids, but represents the parsed results of the dialog, including Arrays for any compound values, and Numbers and Booleans in their correct datatypes.
Making the user interface interactive
Let's step it up a gear now, and make the UI interactive by adding an "Apply" button and using a XULEvent to call a handler function to update the items on stage without closing the dialog.
First of all, we're going to move the randomize code into an event handler function, as well as adding a couple of extra methods to make the randomisation more predictable. Update the existing randomize code as below:
function randomize(event)
{
    collection
        .resetTransform()
        .randomize(event.xul.values)
        .refresh();
}
This should feel very familiar to anyone who codes in ActionScript - an Event object with properties you can query. In this case the event is a XULEvent which will contain information about the click handler you are just about to set up. If you're curious about what the event contains, add a line to inspect it with:
inspect(event);
Now, update the original XUL code to add a button, as well as an event handler for the button:
XUL
    .factory('width,height,rotation,button:Randomize')
    .addEvent('randomize', 'click', randomize)
    .show();
There are two new things to note here:
- We specified a control element type using colon-notation (type:)
- We added an event handler, linked to the control id "randomize", fired on a click, and calling the function randomize.
It's now time again to test your code. Press CTRL+Enter, play with the values, and click Randomize to update the items on stage.
You'll see that the elements are updated on each click. The sharp-eyed among you will have noticed the extra .refresh() method in the event handler. As the Flash stage doesn't focus between calls, we need to force a manual update of the stage with this additional method.
Adding a check to ensure a valid selection
So the Snippet is very nearly finished -- there's only only one more thing we need to do to make it a little more more error-resistant, which is to make sure the user has some items selected before allowing the script to run and the interface to be shown.
To do this, we're going to use the UI class to check that a valid selection has been made:
if(UI.selection)
{
    // do something
}
Wrap the main body of your script, so it looks like this:
xjsfl.init(this);

if(UI.selection)
{
    var collection = new $($selection);

    function randomize(event)
    {
        collection
            .resetTransform()
            .randomize(event.xul.values)
            .refresh();
    }

    XUL
        .factory('width,height,rotation,button:Randomize')
        .addEvent('randomize', 'click', randomize)
        .show();
}
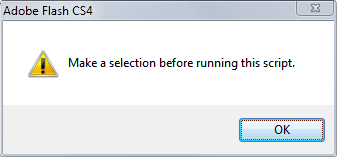
Now, deselect all objects, and try running the script again. You should get the following warning:

This is great, because you didn't need to write any more code than absolutely necessary, and you know that in future your scripts will maintain a level of uniformity regarding error messages.
So there we have a finished xJSFL Snippet, using a variety of xJSFL objects, properties, functions, classes and methods. The next thing to do is package the script as a Snippet, add add it to the Snippets panel.
API reference
Next steps
Working my way through these tutorials. While the docs are being updated – the validation check – if(xjsfl.get.selection()) should change to – if(UI.selection)
Yup. I got a week off from client work so hoping to get a lot of this done in the next 7 – 10 days. Cheers.